Posted on Leave a comment

New Skills: Sock Knitting!

Yes, that’s the new skill I’ve managed to add to my knitting repertoire: sock knitting.

Sock knitting had always baffled me. So many knitters seems to churn them out at the drop of a hat, and yet the very vocabulary of sock knitting terrified me! It especially since it contained words such as: short rows, toe up, cuff- down, grafting and so on.

So when HiyaHiya KAL group connected with me asking me to join their cuff-down KAL, I decided to give it a go and conquer my fears. It further helped that there was a hefty penalty for not completing: I would have to pay up $5 as design price in case I didn’t complete the pair of socks before deadline i.e 30th Nov 2013. Ample time to learn, and enough motivation to get it done indeed! Also the clause that I had to complete a pair would ensure I completed both, not just one sock!

The first sock got done fairly fast. So fast, that I figured I should have cast on both at the same time, I’d have got it done together!!!

Anyway, i did finally manage to complete both socks, and here’s my final result. 🙂

In process: the in-step
in process: the heel
How it looks
How it looks
2 feet together! :)
2 feet together! 🙂


Posted on 2 Comments

Old Denim

Old Denim
Old Denim

The sweater is a part of Artemis Adornments group’s Design Along hosted on Ravelry. Its been a fun experience! The idea was that the designer, Anna, had designed a sweater, and written down the recipe for making it. Now there were no exact sizes to go by, but an idea of how to make it for yourself – hence: a recipe! 🙂

She even threw in the actual patterns that she used within the sweater, but basically encouraged everyone to select a “zig-zag” pattern. I chose something that made me think of seashells. It was a fun design, and actually pretty easy after the first 2 repeats!

The recipe provided a very different way of making a seamless sweater, which I was very thrilled to learn. Though Anna did give detailed instructions on making sleeves, I chose a shortcut and went in for a vest. Will probably make one with sleeves sometime though.

The neck-band was a design that I thought up though. Anna suggested garter stitch or moss stitch to complement the zig-zags, but I wanted an entirely different look, so I went with something entirely different.

I called the sweater Old Denim because of the colors. This is a new variety of variegated yarns introduced by Oswal Woolens. I did start another sweater called Regal with another colorway. This particular colorway reminded me of denim that had been washed enough to lose its color, as just that stage when it sports more than one shade of blue at different parts depending on how much wear it has seen. Hence the name Old Denim. 🙂

the design - pre-blocking
the design – pre-blocking
With the button - post-blocking
With the button – post-blocking

I dont really have any modeled pictures, but I do hope to put up some soon! 🙂


Posted on Leave a comment

New Design – Raised Diamonds

At the starting of this year I decided that I would dedicate this year to making stuff for family. Made a sweater for Mom, and a shawl for Sis-in-law. And proceeded to start a scarf/muffler for Dad and Father-in-law. While the earlier projects got done soon enough, the Dad part of the scarf just got done.

Raised Diamonds
Raised Diamonds

This has been an interesting experience though. When I first designed the scarf, it was also a reversible design. The problem was that the final product was looking as good as the swatch. So it was back to the drawing board for me. And Oh! It was miserable ripping up 2 scarves (I was making them simultaneously).

This design was the one I finally went with. This time I cast on with only 1 yarn, in the thought that I would at least feel half the pain if I needed to rip again! 🙂

But this looked good, and here is the final product! However, the design writing is an exercise I shall contemplate in about a month or so! 😉

Close-up of modeled pic
Posted on Leave a comment

The Search for a Perfect Design – Kobo Cover

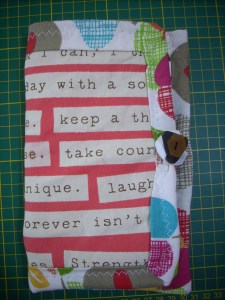
I have made 3 covers as yet. One was knit and the other 2 were sewing projects. While the knit project as well as the first sewing project were carry-covers, the 3rd cover was basically a stand to put my reader so that I’m not constantly holding the reader directly. But I wanted something that covered both these functions nicely.

So here’s the latest attempt:


The Outside
The Outside
The Inside
The Inside
How it looks when ready!
After fitting the Reader in


I think I’m too enamoured with the written word fabric. I really need to stop putting it front and center… I think that’s what spoiling the effect! 🙁

But overall, the dimensions are a bit short. But hey! This is a learning attempt!


Posted on 1 Comment

Finally – Progress!

After struggling to keep knitting through the last couple of weeks, I finally managed to get the biggest piece of Linda Marveng’s Regal Purple done. I’m calling it Regal, and it’s in a lovely set of reds. The yarn is from Oswal Fibers, though this is the first time I don’t see a tag on their yarns. But my LYS insists that these are Oswal’s yarns…

The reason I say biggest piece is because this is a seamed cardigan. I just finished the back. The remaining pieces are the fronts’, the sleeves and the button band. So there’s a long way to go yet.

The problem with reds is that they don’t seem to photograph well. 🙁 I havent given the shoulders in the pics, because, well, I’m not keen on a set of stitch-holders in my pics! 🙂

The back
The back
The design
The design


Posted on Leave a comment

Cotton Apron

When I got up this morning, I promised myself that I’d get cracking on the sweaters that are pending work. However, once I finished breakfast, I suddenly decided i wanted a new apron. I’m not really sure why I want one though, i hardly use it!

But one thing was sure: the apron I already own has strings to be tied at the back.. and I’ve been enamoured by the professional chef aprons that tie right around to the waist in front. It’s just so cool! So that’s what I decided to make.

Another reason is that I desperately need to use up my fabric stash if I intend to buy more fabric.. So my project was for a good cause: to create space for more shopping! 😉

While I havent reached the level where I’m comfortable showing off my haphazard sewing /cutting skills in photographic detail, here’s the final product. Though there are a couple of things I’m proud of:

  • The neat way I managed to make the borders without having fabric lift up after the stitch line
  • My stitched apron strings. This is my second attempt, and I’ve done a great job (even I say so myself)

What I’m not happy about is the fact that the armsyce is different on both sides. I’m not really sure how I managed that, though I do remember thinking that one side seemed easier to stitch than the other…

Without any further ado, there’s my apron!

How it looks on me!
How it looks on me!
Final apron with the disbalanced armsyce
Final apron with the imbalanced armsyce
The neat edges
The neat edges
the neat curved edge


Posted on Leave a comment

DIY – Flower Vase

With all the roses blooming in my home garden, I’ve always wanted a nice flower vase to show them off. Unfortunately, commercial stuff has either been too delicate or too bland. I just haven’t been able to find the one I wanted.

In the meantime, this has mean that all my flowers get shown off in glass bottles. I had an idea for dressing up the said bottles, but somehow I hadn’t gotten around to getting my supplies.

Recently on a grocery run, I managed to pick up all the stuff I wanted. 🙂 So here’s my DIY Flower vase

completed flower vase

You need:

  • A glass bottle – I used old ketchup bottles
  • colored thread – you can opt for paper, cotton or plastic wire. I used a chinese brand macrame plastic wire.
  • Glue – use any multi-purpose glue. I used Fevicol‘s All-fix.
  • Any decorative sequins that you may wish to use.

How to do it:

  • Gather all your supplies
The supplies
The supplies
  • Apply the glue in a ring at the top of the bottle where you will start sticking the thread. Thereafter, draw lines along the length of the bottle. For a small bottle i drew 5 lines which covered most of the bottle
Notice the lines of glues along the bottle length?
  • Stick the start of the thread and hold it in place with your thumb and proceed to wind the thread around the bottle. This may be a bit messy, but is the most effective way. You need to hold the starting point only for a few seconds as the glue will act fast.
  • Keep winding around till you reach the end of the thread. Attach another string in the same manner as the start point and continue winding till you reach the end.
  • The lines of glue will hold the thread in place while you are winding. This makes the entire work less messy than if the whole bottle was covered in glue.
  • Cover the joins with sequins if you wish (I did!)
Sequin overload! :)
Sequin overload! 🙂

Viola! You have a brand new flower vase! 🙂

Posted on Leave a comment

New Bag : Contrast

This particular project is the only one to take on so many forms before finalizing. This was one of the crochet projects I’d started a couple of months back.

It started as a table runner for my dining table. The orange-gray combination was striking against the brown of my table. The I found it was too much of work, so it became placemats, starting with 2 mats, the remaining to be made slowly. This has now taken the form of a bag, simply because I just couldn’t get myself to complete even the 2 placemats!

Anyway, I’m still liking the way it looks. Its been a different experience for me: to sew up so many pieces together. It is only the position of the pieces against each other changes it from a table piece to a bag.

The handle is an i-cord made with 3 strands held together and knit with 5mm DPNs. Hmm. Just can’t leave knitting behind, can I?! 🙂

Here is the result:

The completed bag
The completed bag
another shot :)
another shot 🙂
Before the handle was added
The opening at the top
How it all began
How it all began


Posted on 3 Comments

Mid-week WIPs

My brain’s working over-time! I have so many ideas and too few hands to make them work!

Having said that, I’m right now working on 2 sweaters. Yes, 2, like one wasn’t enough. One is a test knit from Linda Marveng called Regal Purple, and the other is a Design-Along by Anna (Kuduja on Ravelry).
Both are amazing – in construction as well as design.

The sweater for Anna has just got modified from Sweater to Sleeveless Jacket, as in the last 20 minutes. The yarn I’m using is from Oswal and has short color variegation in blue. This yarn called out to me sometime back when chopping with the In-laws, and always remind me of Old Denim… and that’s what it’s called! The premise is to make a completely customised sweater for oneself. So there are no fixed measurements, and one would have to check the size while knitting. This is definitely a very good learning experience for me. The only requirement of the Design-along is that the stitch pattern is supposed be a zig-zag pattern. There is a choice of making the exact one Anna made, or making out own. SO i opted for my own choice of pattern.

The front right panel with zig-zag pattern
The back panel with the neck stitches on holder

The 2nd sweater I’m working on by Linda is really slow-moving. It is a traditional sweater with sleeve length options, and seamed. I don’t think I’ve made a seamed sweater before. Once I discovered the joys of seamless knitting, that has always been my choice. However, I’ve read that when it comes to sweaters, seamed is probably what lasts longer! Hmm. I just hope that with the effort going into this one, it does last!

I’m calling my sweater Regal (as it’s not purple 😉 ) and its being done is another Oswal variegated yarn, this time in reds.

It was a choice between color and clarity: I chose color! :(
It was a choice between color and clarity: I chose color! 🙁

Bothe of these sweaters need to be done by the end of September. While, I’m sure the old Denim will get done, I’m not so confident about the Regal. Here’s to fingers crossed! 🙂

Posted on Leave a comment

New Achievement: Doily in Thread!

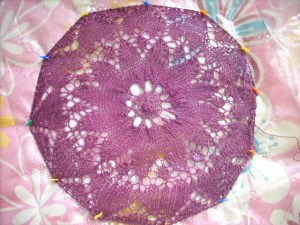
Well, lots of people knit with thread. But this is the first time I actually managed to make something big… in thread. Now, we’re not talking knitting cotton, but proper thread. The type used for doilies, crochet and heavy embroidery! 🙂 So, YAY me!!

I did manage to knit a doily with the Crossed test knit. But have been thinking about the thread one long and hard. I started a couple of times with lace weight wool. But I figured I liked that even less than thread. 🙁

Faced a couple of problems at the beginning. I managed the center crochet cast-on but wasn’t very happy with it. But I still plowed on to find a massive mistake that I made on Line 7. That meant ripping up completely. So I decided that the 2nd attempt would have a knit cast-on. Well, I should have figured there was a reason for the center to be crocheted! Mine turned out messy. But I wasn’t in the mood for ripping again. So I plowed on, and made the smallest size possible!

But it’s done, and that’s all that matters! 🙂

vintage doily
vintage doily
Another angle
Another angle


without the flaws visible! ;)
without the flaws visible! 😉


Posted on Leave a comment

Back to School… Knitting School :)

Recently I’ve found myself studying again. Only thins time it’s not one of my MBA subjects, but Knitting.

Actually this blog post has been triggered by a guest who came home today. She asked me what I did all day, and I told her I knit, I design knitwear (actually, that was stretching the truth) and I teach knitting. Her immediate response was “so, you’re basically free the whole day! You don’t really have any work.” I was honestly taken aback. My family and friends are testimony to the fact that when I start knitting, I don’t have time for anything else, including housework! 😉 And suddenly I was hearing a comment that kind of shook me with this perception. After a lot of discussion (read: monologue) she finally arrived at a happy conclusion: “You cook!” That apparently was acceptable “work”.

So I’ve been taking stock the whole day as to where I am with knitting. And I found that if it was possible, fiber arts could be a full-time formal education course! There is just so much to learn in fiber arts. Not just knitting, but crochet, weaving, even cross-stitch and embroidery! Anyway I don’t really have much talent (or time) for the others, so I’ll stick to knitting.

So i started jotting down what I would teach, if I was offering a formal course in Knitting 101:

  • Understanding Yarn: thickness, types. There’s so much to learn today in terms of blends, what can be blended, what cannot
  • This would also include what can be dyed, what cannot
  • Knitting needles – the sizes of needles, types
  • Knitting accessories
  • Starting to knit -This alone has so many sections!
    • different types of cast-ons
    • Knit, purl basics
    • increases and decreases
    • types of Bind-offs
  • Understanding gauge/tension
  • Knitting textures: knit-purl designs
  • Knitting textures: lace and cables basics
  • Knitting textures: twisted stitches, bobble
  • Knitting Textures: Edgings and beading
  • Garment structure
  • Garment basic design

This is something that has been on my mind for some time. I’m just hoping I manage to make it come true! Of course, with all the “practicals” interspersed with each of the sections, it probably would take close to 3-4 months for 1 course! 🙂

Next I’ll come to what I want to learn: Garment Design. This also includes writing my own designs. And there’s so much to learn!!!

Starting from being able to design the garment of choice, to the patterns that I would use. And then comes writing it all down. This alone is a huge section. Earlier today I came across this website called Stitch Maps that looks at design is a very visual way. That’s such a different way of looking at design! I’ve always thought Knitting charts to be very linear, while crochet charts to be free-form. Now this site has managed to make knitting charts in free-form style!

After all this comes editing the said designing. I hadn’t heard about knitting requiring technical editing before. Tech Edit was something that techies did for their design documents. But, Knitting?! The answer is yes! Apparently there is a lot going into tech editing a knit design. Most design publications have their own teams of tech editors! Wow! That seems to be a whole new world!

The of course comes the selling, promotions and publication of designs. Whew!

What I haven’t covered are advance knitting skills such as Intarsia, Entrelac, knitting small circular items such as socks and mittens, Double Knitting, knitting with color, Fair Isle knitting, pockets… the list goes on.

I’m not really sure if I could possibly try everything on this list. But I’ll try at least one item in each.  here’s to wishing me luck! 🙂